How to Run Command Prompt as an Administrator

In this topic you will learn how to open a command prompt with full administrator permissions. There are Four easy methods to run command prompt as administrator such as Start Menu, Folder file menu , Quick Access Toolbar and from context menu. This method works on windows 8 and 8.1. The context menu method is also works on windows 7.

1.Run from Start Menu.

  1. Click Start.
  2. In the Start Search box, type cmd
  3. Right-click Command prompt, and then click Run as administrator.
  4. In the User Account Control dialog click yes to Continue.
 &nbsp &nbsp &nbsp[>>>  OR  <<<]
  1. Click Start.
  2. In the Start Search box, type cmd, and then press "Ctrl+Shift+Enter".
  3. In the User Account Control dialog click yes to Continue.

2.Run from any Folder.

  1. Open Folder.
  2. Click File menu and then navigate to Open command prompt.
  3. In "Open command prompt" you find two way normal method and admin method.
  4. Click " Open command prompt as administrator" to open.

3.Run form Quick Access Toolbar.

  1. Open Folder.
  2. Click File menu and then navigate to Open command prompt.
  3. In "Open command prompt&auot; you find two way normal method and admin method.
  4. Right Click on "Open command prompt as administrator" after that click "Add to Quick Access Toolbar".
  5. Now you can open admin cmd easily form Quick access toolbar.

4.Run form Context Menu.

Install Registry key in your system to run command prompt as administrator from context menu.

Windows Registry Editor Version 5.00

[HKEY_CLASSES_ROOT\Directory\background\shell\runas]
"icon"="imageres.dll,73"
@="Run CMD as administrator"

[HKEY_CLASSES_ROOT\Directory\background\shell\runas\command]
@="cmd.exe /s /k \"pushd %V && title Command Prompt\""

Download Run CMD as administrator.zip

Video

How to Copy a File Path to the Clipboard using Context menu

In this topic you will learn how to copy the full path of file or folder location to windows clipboard. It is very useful when we try to upload a file EX: Uploading file to email or uploading image to facebook etc..,

Copy File or Folder path Using context menu.

  1. Open Windows Explorer and navigate to the file or folder that you want to copy the path to clipboard.
  2. Hold the “Shift” Key and right click the file.
  3. In the context menu click “Copy as path” to copy the file path location.
  4. Now press “Ctrl + V” to paste the location.

Tips & Warnings

  1. This method will not works on Windows XP but it will works on Windows Vista, Windows 7 and Windows 8,8.1

How to create own name File and Folder using context menu

In windows by default you can create “New folder, New folder (2), etc..,”. By this method you can create your own name (custom name) folder EX:“ MDSN, MDSN (2), etc..,”. By this method we can also create our own name file’s using context menu.

1.Creating own name Files.

You can create own name file such as .txt, doc etc..,
Open Registry Editor
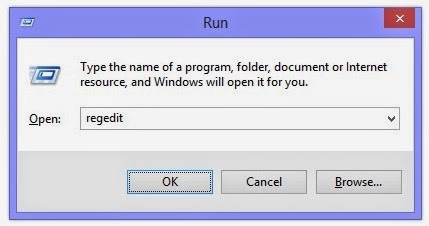
Open run command ( windows key + r ).
Type regedit to open Registry Editor.

First create the file you want to change the name
Ex:"New Text Document.txt" form context menu.
Copy the file name "New Text Document".
After that remove text "New" and copy text as "Text Document".
Goto the registry editor and press Ctrl + F to find Text Document in my sytem I found (Default) value "OOXML Text Document" it is different for all system. Keep search the value until you find the exact value.
If you find then rename it to your name or any name.
(Before renaming copy the value. Because if it’s not works then you can restore the name.)
If it's not work do the same steps because mostly all important information are stored in windows registry.

2.Creating own name folder.

First
Download Create own name Folder.BAT.zip
Download Create own name Folder.reg.zip

Unzip the file “Create own name Folder.BAT.zip”  after that open “Create own name Folder.BAT” form notepad.
    
::EX: Inside of  "NAME"=="MOHAMED USHMAN [ MDSN ]"  Edit 3 times inside of "NAME"

::EX: " [ "==" (" ---"{ " 

::EX: " ] "==" )" ---" }" 

::Don't use EX:\ / : * ? " < > |

cmd /c
FOR /L %%A IN (2,+1,100) Do (if exist "NAME" ( MD "NAME"" [ ""%%A"" ]"&&EXIT ) ELSE ( MD "NAME"&&EXIT ) )


In the batch file code rename “NAME” to any name EX: “MDSN” 3 times
    
::EX: Inside of  "NAME"=="MOHAMED USHMAN [ MDSN ]"  Edit 3 times inside of "NAME"

::EX: " [ "==" (" ---"{ " 

::EX: " ] "==" )" ---" }" 

::Don't use EX:\ / : * ? " < > |

cmd /c
FOR /L %%A IN (2,+1,100) Do (if exist "MDSN" ( MD "MDSN"" [ ""%%A"" ]"&&EXIT ) ELSE ( MD "MDSN"&&EXIT ) )


After that save and run “Create own name Folder.BAT”. If you create your folder successfully then install the “Create own name Folder.reg” file in your system.

Open Registry Editor
Open run command ( windows key + r ).
Type regedit to open Registry Editor.
Navigate to the
 
HKEY_CLASSES_ROOT\Directory\Background\shell\Create own name Folder
Right click on (Default) key value. Then click Modify...
Enter Value Data: MDSN (Any Name)
After that Navigate to the
 
HKEY_CLASSES_ROOT\Directory\Background\shell\Create own name Folder\command
Right click on (Default) key value. Then click Modify...
Enter Value Data: EX:
 
cmd /c FOR /L %%A IN (2,+1,100) Do (if exist "MDSN" ( MD "MDSN"" [ ""%%A"" ]"&&EXIT ) ELSE ( MD "MDSN"&&EXIT ) )


Now you can create own name folder

Video

How to register or unregister OCX & DLL file using administrator cmd & context menu

Using this method you can register DLL and OCX file using Command prompt or by Context menu when you right click on the file. The Command prompt method works on all Windows OS but the context men method works on windows 7 and above version of windows 7 such as windows 8 , 8.1.

For an Example if you installed Windows OS in C:\ drive then follow the steps.
1.If you are using 32 bit Windows OS then past your DLL or OCX file in
C:\Windows\System32

2.If you are using 64 bit Windows OS then past your DLL or OCX file in
C:\Windows\SysWOW64

1.Register from Command prompt

Open Administrator command prompt
for 32 bit os
using admin cmd Ex: regsvr32 C:\Windows\System32\filename.dll

for 64 bit os
using admin cmd Ex: regsvr32 C:\Windows\SysWOW64\filename.dll

2.Register from Context menu

Using this method you can intall DLL or OCX file's form Context menu.

Download OCXDLL.bat.zip copy and past the OCXDLL.bat in C:\ location
Download OCXDLL.reg.zip and install the registry file

1.If you are using 32 bit Windows OS then past your DLL or OCX file in
C:\Windows\System32

2.If you are using 64 bit Windows OS then past your DLL or OCX file in
C:\Windows\SysWOW64

Right click the file after that you can register or unregister OCX & DLL files form context menu.

Download COMDLG32.OCX.zip if you need.

Video

How to create a CLSID to open files or folder from different location

Now you can open files, folders form different location such as My Computer, Control panel, Context menu. By creating CLSID form windows registry, you can create your own CLSID to lunch file and folder form different location(special folders).


1.Open Registry Editor

Open run command ( windows key + r ).
Type regedit to open Registry Editor.

2. Creating class ID

Before creating CLSID you must have to conform that the CLSID is not in the registry. If CLSID is not there means you can create your own CLSID in windows system. , if you find the same CLSID then change it to another name.

Ex: Assume that you’re going to create CLSID “{00000000-0000-0000-0000-000000000001}”.

    
Windows Registry Editor Version 5.00

;explorer.exe /n,/e,/root,C:\\MDSN or c:\\MDSN.txt 

;if you using exe file to open C:\\MDSN.exe

[HKEY_CLASSES_ROOT\CLSID\{00000000-0000-0000-0000-000000000001}]
@="Name"
"InfoTip"="Files and Folders"

[HKEY_CLASSES_ROOT\CLSID\{00000000-0000-0000-0000-000000000001}\DefaultIcon]
@="shell32.dll,7"

[HKEY_CLASSES_ROOT\CLSID\{00000000-0000-0000-0000-000000000001}\InProcServer32]
@="shell32.dll"
"ThreadingModel"="Apartment"

[HKEY_CLASSES_ROOT\CLSID\{00000000-0000-0000-0000-000000000001}\Shell]

[HKEY_CLASSES_ROOT\CLSID\{00000000-0000-0000-0000-000000000001}\Shell\Open]

[HKEY_CLASSES_ROOT\CLSID\{00000000-0000-0000-0000-000000000001}\Shell\Open\Command]
@="msg * Its working"


;MyComputer
[HKEY_LOCAL_MACHINE\SOFTWARE\Microsoft\Windows\CurrentVersion\Explorer\MyComputer\NameSpace\{00000000-0000-0000-0000-000000000001}]


;ControlPanel
;[HKEY_LOCAL_MACHINE\SOFTWARE\Microsoft\Windows\CurrentVersion\Explorer\ControlPanel\NameSpace\{00000000-0000-0000-0000-000000000001}]


;Desktop
;[HKEY_LOCAL_MACHINE\SOFTWARE\Microsoft\Windows\CurrentVersion\Explorer\Desktop\NameSpace\{00000000-0000-0000-0000-000000000001}]
    

Download CLSID.reg.zip

3. Add file or folder to CLSID

Using registry editor if you want to change the name of the CLSID then Navigate to
  
HKEY_CLASSES_ROOT\CLSID\{00000000-0000-0000-0000-000000000001}
Edit value name: (Default)= Any Name
After that Navigate to
  
HKEY_CLASSES_ROOT\CLSID\{00000000-0000-0000-0000-000000000001}\Shell\Open\Command

Edit value name: (Default)
for File(Default) =C:\Program Files (x86)\MDSN Welcome\MDSN Welcome.exe
[you can add any type of file Ex: .txt,.doc,etc..,]
for Folder(Default) =explorer.exe /n,/e,/root,C:\MDSN

4.Open file or folder for special folders like MyComputer or ControlPanel

For an Ex if you want to add it to my computer then in CLSID.reg file
Navigate to ; MyComputer ;[HKEY_LOCAL_MACHINE\SO...
(Remove the “; - semicolon” from [HKEY_LOCAL_MACHINE\SO ...)
Save and install CLSID.reg file.

5.Opening form context menu

Follow step 4 to add file or folder to open form context menu
For Desktop only


Windows Registry Editor Version 5.00

;explorer.exe /n,/e,/root,C:\\MDSN or c:\\MDSN.txt

;if you using exe file to open C:\\MDSN.exe

;For Desktop only

[HKEY_CLASSES_ROOT\DesktopBackground\Shell\For Desktop only]
"icon"="shell32.dll,7"
@="For Desktop only"

[HKEY_CLASSES_ROOT\DesktopBackground\Shell\For Desktop only\command]
@="msg * Its working"
Download For Desktop only.reg.zip

For all Directorys(Folders)and Desktop

Windows Registry Editor Version 5.00

;explorer.exe /n,/e,/root,C:\\MDSN or c:\\MDSN.txt 

;if you using exe file to open C:\\MDSN.exe

;For all Directorys(Folders)and Desktop

[HKEY_CLASSES_ROOT\Directory\Background\shell\For Folders and Desktop]
"icon"="shell32.dll,7"
@="For Folders and Desktop"

[HKEY_CLASSES_ROOT\Directory\Background\shell\For Folders and Desktop\command]
@="msg * Its working"
Download For all Directorys ( Folders ) and Desktop.reg.zip

Tips & Warnings

  1. Create System restore point because if anything goes wrong then you can restore your system.
  2. If you want to delete the created CLSID then just delete CLSID.( Delete only you created value's because if you delete anything else form registry means it will damage your system.


Video

How to edit context menu ( open ) to custom name for windows folder

Do you want to change the context menu (OPEN) for Folder? This method will help's to change the character in the context menu when you right click on the windows Folder.


How to change context menu ( open ) to custom name for windows folder

Open Registry Editor

Open run command ( windows key + r ).
Type regedit to open Registry Editor.

How to change context menu ( open ) to custom name for windows folder

Navigate to the

  HKEY_CLASSES_ROOT\Folder\shell\open
Right click on (Default) key value. Then click Modify...
Enter Value Data: (Any character EX: Name or Number etc..,)

How to change context menu ( open ) to custom name for windows folder

click ok to perform action.
you can see the name [ Open ] is change to custom name [ MDSN ( Open ) ]

How to change context menu ( open ) to custom name for windows folder

Restore the context menu

If you want to restore the context menu to open.
Navigate to the
HKEY_CLASSES_ROOT\Folder\shell\open
Then Delete the (Default) key.

How to change context menu ( open ) to custom name for windows folder