Comment line in C Program

Comment line in C Program
The comment statement is not executable. Comments are like helping text in C program and they are ignored by the compiler and it is very helpful to understand the program easily. There are two types of comment in C program.
  1. Single line comment
  2. Multi line comment

1.Single line comment

  1. It can be Placed anywhere in C program
  2. Single line comment starts with " // "
  3. It can't be split over Multiple lines like Multi line comment
  4. Any symbols written after "//" will be ignored by C compiler.
Example:

// Title   :  Learn C
// Author  :  Mohamed Ushman
#include <stdio.h> 
int main()
 {
  printf("Learn C :)");   // Single line comment 
  return 0;// Until the end of line will be ignored by C compiler 
 }

2. Multi line comment

  1. It can be Placed anywhere in C program
  2. Single line comment starts with "/*" and ends with "*/"
  3. It can be split over Multiple lines
  4. It can be used like Single line comment
Example:

/*
  Title     :  Learn C
  Author  :  Mohamed Ushman
  */
  #include <stdio.h> 
  int main()
  {
  printf("Learn C :)");   /* It can be used like Single line comment */
/*-----------------------------------------------------------------
  printf("Learn C program");   Ignored By C Compiler
 ------------------------------------------------------------------*/
  return 0; 
  }

Different way of using comments

We can use comment to specify variables and some operation like addition, subtraction, etc.., .
Example:

/*********************************
  *    Title     :  Learn C
  *    Author  :  Mohamed Ushman
  *********************************/
  #include <stdio.h> 
  int main()
  {
  int a=5,b=5;
  int c;       //   To display output
  c=a+b;   //  Adition 
/*
  c=a-b;   //  Subtraction 
  */
printf("Value of c=%d",c);
  return 0; 
  }
  

Basic Structure of C Program

Basic Structure of C Program

Getting Started

Basic Structure of C Program

First step is to understand the structure of a “ C “ programming language using simple C program.
Let us look a simple code that would print the word “Learn C :) ”.

#include <stdio.h>
int main()
{
 /* My First program in C :) */
 printf("Learn C :)");
 return 0;
 }
 

Output

Learn C :)

S.no Coding Explanation
1 #include <stdio.h> This is a preprocessor command it tells the C compiler to include “stdio.h” from the C library before compiling a C program.
2 int main() This is the main function from where execution of any C program begins.
3 { This indicates the beginning of the main function.
4 /*_some_comments_*/
or
// some_comments
The comments are ignored by compiler. [ “ /*..*/ ”,” //... “ ]
5 printf("Learn C :)"); printf command prints the output onto the screen.
6 return 0; This command terminates C program (main function) and returns 0 value to the main function.
7 } This indicates the end of the main function.
 

Semicolon ( ; )

In C program, the semicolon is a statement terminator. In each individual statement must be ended with a semicolon.

Comma operator ( , )

The coma operator is used to separates the elements of variables in data type or element in array etc.
Ex: int a=7,b,c;

Whitespace (   )

Whitespace is the term used in C to describe blanks space like tabs, horizontal tab, newline characters(pressing Enter key and write coding in new line ) and space between comments. Whitespace separates one part of a statement from another and enables the compiler to identify elements in a statement.
Ex: int i, void main(), etc..,.

The following two example program will help you to learn more about whitespace.
Example: 1:-More Whitespace

#include <stdio.h>
  int main()
  {
  printf
  (
 " Learn C :) "
 )
  ;
  return 0;
  } 

Remember at least one whitespace character (space) between int main(), int i;, return 0;, etc..,
Example: 2:-

#include <stdio.h>
int main(){printf(" Learn C :) ");return 0;} 
The above two program output will be same

Output

Learn C :)

History of c programming language

History of c programming language
C programming language is a foundation of C++. Learning C is the first step to learn C++ because you cannot skip step, you must have to learn C before learning C++. C is one of the most widely used programming languages of all time. Many later languages like Objective-C, Java, JavaScript, C#, Perl, PHP, Python, etc.., have borrowed directly or indirectly from C language.

History of C Language

  • C is a programming language developed “ AT & T’s  Bell Laboratories ”  of USA  in 1972.  C was written by Dennis M.Ritchie.
  • Brian W. Kernighan and Dennis M. Ritchie produced the first publicly available description of  C known as “K&R C”.
  • The UNIX Operating System and essentially UNIX application program have been written in C.
  • The language was formalized in 1989 by American National Standards Institute (ANSI).
The following table illustrates the history of “ C “ Language.
Programming Language    Year    Founder
ALGOL 1960 International group
BCPL 1967 Martin Richards
B 1970 Ken Thompson
C 1972 Dennis Richie
K&R C 1978 Brian Kernighan and Dennis Ritchie
ANSI C 1989 ANSI Committee
ANSI/ISO 1990 ISO Committee

C89/C90 standard:

In 1990 ANSI C become ISO standard, the programming Language C is also called "C89" and "C90".

C99 standard:

C99 version published in 1999. It includes new futures like inline function and advanced data type and other changes.

C11 standard:

C11 standard adds new features to C and the library, including type generic macros, anonymous structures, improved Unicode support, atomic operations, multi-threading, and bounds-checked functions. It also makes some portions of the existing C99 library optional, and improves compatibility with C++.

Embedded C:

Embedded C includes features not available in normal C like fixed-point arithmetic, named address spaces, and basic I/O hardware addressing.

How to Copy a File Path to the Clipboard using Context menu

In this topic you will learn how to copy the full path of file or folder location to windows clipboard. It is very useful when we try to upload a file EX: Uploading file to email or uploading image to facebook etc..,

Copy File or Folder path Using context menu.

  1. Open Windows Explorer and navigate to the file or folder that you want to copy the path to clipboard.
  2. Hold the “Shift” Key and right click the file.
  3. In the context menu click “Copy as path” to copy the file path location.
  4. Now press “Ctrl + V” to paste the location.

Tips & Warnings

  1. This method will not works on Windows XP but it will works on Windows Vista, Windows 7 and Windows 8,8.1

How to create own name File and Folder using context menu

In windows by default you can create “New folder, New folder (2), etc..,”. By this method you can create your own name (custom name) folder EX:“ MDSN, MDSN (2), etc..,”. By this method we can also create our own name file’s using context menu.

1.Creating own name Files.

You can create own name file such as .txt, doc etc..,
Open Registry Editor
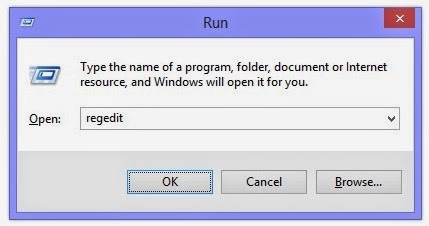
Open run command ( windows key + r ).
Type regedit to open Registry Editor.

First create the file you want to change the name
Ex:"New Text Document.txt" form context menu.
Copy the file name "New Text Document".
After that remove text "New" and copy text as "Text Document".
Goto the registry editor and press Ctrl + F to find Text Document in my sytem I found (Default) value "OOXML Text Document" it is different for all system. Keep search the value until you find the exact value.
If you find then rename it to your name or any name.
(Before renaming copy the value. Because if it’s not works then you can restore the name.)
If it's not work do the same steps because mostly all important information are stored in windows registry.

2.Creating own name folder.

First
Download Create own name Folder.BAT.zip
Download Create own name Folder.reg.zip

Unzip the file “Create own name Folder.BAT.zip”  after that open “Create own name Folder.BAT” form notepad.
    
::EX: Inside of  "NAME"=="MOHAMED USHMAN [ MDSN ]"  Edit 3 times inside of "NAME"

::EX: " [ "==" (" ---"{ " 

::EX: " ] "==" )" ---" }" 

::Don't use EX:\ / : * ? " < > |

cmd /c
FOR /L %%A IN (2,+1,100) Do (if exist "NAME" ( MD "NAME"" [ ""%%A"" ]"&&EXIT ) ELSE ( MD "NAME"&&EXIT ) )


In the batch file code rename “NAME” to any name EX: “MDSN” 3 times
    
::EX: Inside of  "NAME"=="MOHAMED USHMAN [ MDSN ]"  Edit 3 times inside of "NAME"

::EX: " [ "==" (" ---"{ " 

::EX: " ] "==" )" ---" }" 

::Don't use EX:\ / : * ? " < > |

cmd /c
FOR /L %%A IN (2,+1,100) Do (if exist "MDSN" ( MD "MDSN"" [ ""%%A"" ]"&&EXIT ) ELSE ( MD "MDSN"&&EXIT ) )


After that save and run “Create own name Folder.BAT”. If you create your folder successfully then install the “Create own name Folder.reg” file in your system.

Open Registry Editor
Open run command ( windows key + r ).
Type regedit to open Registry Editor.
Navigate to the
 
HKEY_CLASSES_ROOT\Directory\Background\shell\Create own name Folder
Right click on (Default) key value. Then click Modify...
Enter Value Data: MDSN (Any Name)
After that Navigate to the
 
HKEY_CLASSES_ROOT\Directory\Background\shell\Create own name Folder\command
Right click on (Default) key value. Then click Modify...
Enter Value Data: EX:
 
cmd /c FOR /L %%A IN (2,+1,100) Do (if exist "MDSN" ( MD "MDSN"" [ ""%%A"" ]"&&EXIT ) ELSE ( MD "MDSN"&&EXIT ) )


Now you can create own name folder

Video

How to register or unregister OCX & DLL file using administrator cmd & context menu

How to register or unregister OCX & DLL file using administrator cmd & context menu
Using this method you can register DLL and OCX file using Command prompt or by Context menu when you right click on the file. The Command prompt method works on all Windows OS but the context men method works on windows 7 and above version of windows 7 such as windows 8 , 8.1.

For an Example if you installed Windows OS in C:\ drive then follow the steps.
1.If you are using 32 bit Windows OS then past your DLL or OCX file in
C:\Windows\System32

2.If you are using 64 bit Windows OS then past your DLL or OCX file in
C:\Windows\SysWOW64

1.Register from Command prompt

Open Administrator command prompt
for 32 bit os
using admin cmd Ex: regsvr32 C:\Windows\System32\filename.dll

for 64 bit os
using admin cmd Ex: regsvr32 C:\Windows\SysWOW64\filename.dll

2.Register from Context menu

Using this method you can intall DLL or OCX file's form Context menu.

Download OCXDLL.bat.zip copy and past the OCXDLL.bat in C:\ location
Download OCXDLL.reg.zip and install the registry file

1.If you are using 32 bit Windows OS then past your DLL or OCX file in
C:\Windows\System32

2.If you are using 64 bit Windows OS then past your DLL or OCX file in
C:\Windows\SysWOW64

Right click the file after that you can register or unregister OCX & DLL files form context menu.

Download COMDLG32.OCX.zip if you need.

Video

How to create a CLSID to open files or folder from different location

Now you can open files, folders form different location such as My Computer, Control panel, Context menu. By creating CLSID form windows registry, you can create your own CLSID to lunch file and folder form different location(special folders).


1.Open Registry Editor

Open run command ( windows key + r ).
Type regedit to open Registry Editor.

2. Creating class ID

Before creating CLSID you must have to conform that the CLSID is not in the registry. If CLSID is not there means you can create your own CLSID in windows system. , if you find the same CLSID then change it to another name.

Ex: Assume that you’re going to create CLSID “{00000000-0000-0000-0000-000000000001}”.

    
Windows Registry Editor Version 5.00

;explorer.exe /n,/e,/root,C:\\MDSN or c:\\MDSN.txt 

;if you using exe file to open C:\\MDSN.exe

[HKEY_CLASSES_ROOT\CLSID\{00000000-0000-0000-0000-000000000001}]
@="Name"
"InfoTip"="Files and Folders"

[HKEY_CLASSES_ROOT\CLSID\{00000000-0000-0000-0000-000000000001}\DefaultIcon]
@="shell32.dll,7"

[HKEY_CLASSES_ROOT\CLSID\{00000000-0000-0000-0000-000000000001}\InProcServer32]
@="shell32.dll"
"ThreadingModel"="Apartment"

[HKEY_CLASSES_ROOT\CLSID\{00000000-0000-0000-0000-000000000001}\Shell]

[HKEY_CLASSES_ROOT\CLSID\{00000000-0000-0000-0000-000000000001}\Shell\Open]

[HKEY_CLASSES_ROOT\CLSID\{00000000-0000-0000-0000-000000000001}\Shell\Open\Command]
@="msg * Its working"


;MyComputer
[HKEY_LOCAL_MACHINE\SOFTWARE\Microsoft\Windows\CurrentVersion\Explorer\MyComputer\NameSpace\{00000000-0000-0000-0000-000000000001}]


;ControlPanel
;[HKEY_LOCAL_MACHINE\SOFTWARE\Microsoft\Windows\CurrentVersion\Explorer\ControlPanel\NameSpace\{00000000-0000-0000-0000-000000000001}]


;Desktop
;[HKEY_LOCAL_MACHINE\SOFTWARE\Microsoft\Windows\CurrentVersion\Explorer\Desktop\NameSpace\{00000000-0000-0000-0000-000000000001}]
    

Download CLSID.reg.zip

3. Add file or folder to CLSID

Using registry editor if you want to change the name of the CLSID then Navigate to
  
HKEY_CLASSES_ROOT\CLSID\{00000000-0000-0000-0000-000000000001}
Edit value name: (Default)= Any Name
After that Navigate to
  
HKEY_CLASSES_ROOT\CLSID\{00000000-0000-0000-0000-000000000001}\Shell\Open\Command

Edit value name: (Default)
for File(Default) =C:\Program Files (x86)\MDSN Welcome\MDSN Welcome.exe
[you can add any type of file Ex: .txt,.doc,etc..,]
for Folder(Default) =explorer.exe /n,/e,/root,C:\MDSN

4.Open file or folder for special folders like MyComputer or ControlPanel

For an Ex if you want to add it to my computer then in CLSID.reg file
Navigate to ; MyComputer ;[HKEY_LOCAL_MACHINE\SO...
(Remove the “; - semicolon” from [HKEY_LOCAL_MACHINE\SO ...)
Save and install CLSID.reg file.

5.Opening form context menu

Follow step 4 to add file or folder to open form context menu
For Desktop only


Windows Registry Editor Version 5.00

;explorer.exe /n,/e,/root,C:\\MDSN or c:\\MDSN.txt

;if you using exe file to open C:\\MDSN.exe

;For Desktop only

[HKEY_CLASSES_ROOT\DesktopBackground\Shell\For Desktop only]
"icon"="shell32.dll,7"
@="For Desktop only"

[HKEY_CLASSES_ROOT\DesktopBackground\Shell\For Desktop only\command]
@="msg * Its working"
Download For Desktop only.reg.zip

For all Directorys(Folders)and Desktop

Windows Registry Editor Version 5.00

;explorer.exe /n,/e,/root,C:\\MDSN or c:\\MDSN.txt 

;if you using exe file to open C:\\MDSN.exe

;For all Directorys(Folders)and Desktop

[HKEY_CLASSES_ROOT\Directory\Background\shell\For Folders and Desktop]
"icon"="shell32.dll,7"
@="For Folders and Desktop"

[HKEY_CLASSES_ROOT\Directory\Background\shell\For Folders and Desktop\command]
@="msg * Its working"
Download For all Directorys ( Folders ) and Desktop.reg.zip

Tips & Warnings

  1. Create System restore point because if anything goes wrong then you can restore your system.
  2. If you want to delete the created CLSID then just delete CLSID.( Delete only you created value's because if you delete anything else form registry means it will damage your system.


Video

How to edit context menu ( open ) to custom name for windows folder

Do you want to change the context menu (OPEN) for Folder? This method will help's to change the character in the context menu when you right click on the windows Folder.


How to change context menu ( open ) to custom name for windows folder

Open Registry Editor

Open run command ( windows key + r ).
Type regedit to open Registry Editor.

How to change context menu ( open ) to custom name for windows folder

Navigate to the

  HKEY_CLASSES_ROOT\Folder\shell\open
Right click on (Default) key value. Then click Modify...
Enter Value Data: (Any character EX: Name or Number etc..,)

How to change context menu ( open ) to custom name for windows folder

click ok to perform action.
you can see the name [ Open ] is change to custom name [ MDSN ( Open ) ]

How to change context menu ( open ) to custom name for windows folder

Restore the context menu

If you want to restore the context menu to open.
Navigate to the
HKEY_CLASSES_ROOT\Folder\shell\open
Then Delete the (Default) key.

How to change context menu ( open ) to custom name for windows folder

How to set or create a background image in windows xp folder

How to set or create a background image in windows xp folder
Set background image for Windows XP folder. This method is very useful to set jpg image for windows folder changed easily without any software or application. This method only works on Windows XP and lower version of Windows XP such as Windows 98.


1.Create the folder to change the background.

2.Open the notepad and past the following coding

    
[{BE098140-A513-11D0-A3A4-00C04FD706EC}]
iconarea_image=”image_name.jpg”
iconarea_text=0X00F0F0FF
    

3. Save the file as desktop.ini in the folder.

4.Now go to the Properties by clicking right button on the Folder icon and then click on Customize Tab and then on Change Icon.

5.Now just select any icon and click on the OK button.

some hex code for font color:

    
 0xFF0000 = blue        
 0xFFFF00 = blue light   
 0x000000 = black          
 0xA8A8A8 = gray         
 0x33CC00 = green        
 0xEAADEA = pink        
 0xE10000 = red             
 0xFFFFFF = white        
 0x00FFFF = yellow

Video